พื้นฐาน State Management Provider & Consumer


วันนี้พอได้มีเวลานั่งศึกษา Flutter อยากจะเริ่มต้นแบบ Basic ไปเรื่อยๆ เพราะที่ผ่านมาผมมักจะหยิบจับเอานั้นเอานี้มาใส่รวามกันแล้วออกเป็น Project เลย… วันนี้เลยได้ลองดูคลิปการสอน Flutter KongRuksiam ตอน “พัฒนาแอพด้วย Flutter & Database จัดการฐานข้อมูล [Full Course]” หัวใจหลักของเรื่องนี้คือการส่งข้อมูลระหว่าง Back office ที่ทำข้อมูลไปยัง Front Office ที่มีการนำเสนอข้อมูล ออกไป โดยการใช้ Provider และ Consumer
จากตัวอย่างจะเป็นการทำฐานจ้อมูล โดยใช้ Class กำหนดโครงสร้างข้อมูล ผ่าน Constructor แล้ว สร้าง List<xxxx> ภายใน Class ที่ใช้เก็บข้อมูล แบบใช้ changNotifier
1.โครงสร้างข้อมูล Class Transaction
class Transaction {
  String title; // ชื่อรายการ
  double amount; // จำนวนเงิน
  DateTime date; // วันวลา บันทึกรายการ

  Transaction({required this.title, required this.amount, required this.date});
}
2. โครงสร้าง Transaction
import 'package:examdatabase/model/transaction.dart';
import 'package:flutter/foundation.dart';

class TransactionProvider with ChangeNotifier {
  //  ตัวอย่างข้อมูล
  List<Transaction> transactions = [
    // Transaction(title: "ซื้อหนังสือ", amount: 500, date: DateTime.now()),
    // Transaction(title: "ซื้อเสื้อ", amount: 900, date: DateTime.now()),
    // Transaction(title: "ซื้อกางเกง", amount: 400, date: DateTime.now()),
    // Transaction(title: "นาฬิกา", amount: 1400, date: DateTime.now()),
  ];
  List<Transaction> getTransaction() {
    return transactions;
  }

  void addTransaction(Transaction statement) {
    // transactions.add(statement);   //เพิ่มข้อมูลต่อท้าย
    transactions.insert(0, statement); // แทรกข้อมูลด้านบนสุด

    //แจ้งเตือน Consumer
    notifyListeners();
  }
}
3.กำหนด Provider ให้กับ Widget ที่ใช้งาน
class MyApp extends StatelessWidget {
  const MyApp({super.key});

  // This widget is the root of your application.
  @override
  Widget build(BuildContext context) {
    return MultiProvider(
      providers: [
        ChangeNotifierProvider(create: (context) {
          return TransactionProvider();
        })
      ],
      child: MaterialApp(
        title: 'Flutter Demo',
        theme: ThemeData(
          primarySwatch: Colors.purple,
        ),
        home: const MyHomePage(title: 'Example Database'),
      ),
    );
  }
}
4.กำหนด Consumer แสดงผลข้อมูล
 Widget build(BuildContext context) {
    return Scaffold(
        appBar: AppBar(
          actions: [
            IconButton(
                onPressed: () {
                  Navigator.push(context, MaterialPageRoute(builder: (context) {
                    return FormScreen();
                  }));
                },
                icon: Icon(Icons.add))
          ],
          title: Text(widget.title),
        ),
        body: Consumer(
          builder: (context, TransactionProvider provider, Widget? child) {
            var count = provider.transactions.length;
            if (count <= 0) {
              return Center(
                child: Text("ไม่พบข้อมูล",style: TextStyle(fontSize: 35),),
              );
            } else {
              return ListView.builder(
                  itemCount: count,
                  itemBuilder: (context, int index) {
                    Transaction data = provider.transactions[index];
                    return Card(
                      elevation: 10,
                      margin:
                          EdgeInsets.symmetric(vertical: 5, horizontal: 15),
                      child: ListTile(
                        leading: CircleAvatar(
                          child: FittedBox(
                              child: Text(
                            data.amount.toString(),
                            style: TextStyle(
                                fontSize: 14, fontWeight: FontWeight.bold),
                          )),
                          radius: 30,
                        ),
                        title: Text(data.title),
                        subtitle: Text(DateFormat("dd/MM/yyyy H:m").format(data.date)),
                      ),
                    );
                  });
            }
          },
        ));
  }
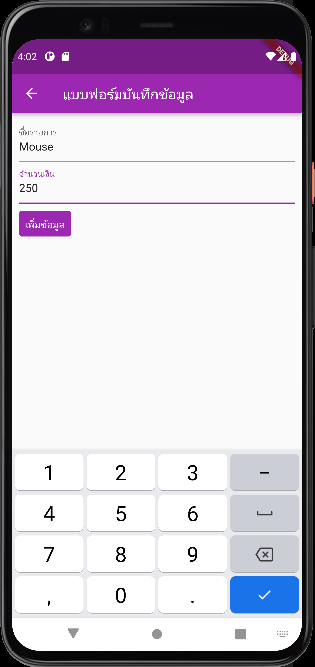
5. เรียกใช้ Method addTrasaction เพื่อเพิ่มข้อมูลจาก Form
class FormScreen extends StatelessWidget {
  // const FormScreen({super.key});
  final formkey = GlobalKey<FormState>();
  // Controller
  final titleController = TextEditingController();
  final amountController = TextEditingController();
  @override
  Widget build(BuildContext context) {
    return Scaffold(
        appBar: AppBar(
          title: Text('แบบฟอร์มบันทึกข้อมูล'),
        ),
        body: Padding(
          padding: const EdgeInsets.all(10.0),
          child: Form(
              key: formkey,
              child: Column(
                crossAxisAlignment: CrossAxisAlignment.start,
                mainAxisAlignment: MainAxisAlignment.start,
                children: [
                  TextFormField(
                    controller: titleController,
                    decoration: InputDecoration(label: Text('ชื่อรายการ')),
                    autofocus: true,
                    validator: (String? str) {
                      if (str!.isEmpty) {
                        return "กรุณาป้อนชื่อรายการ";
                      }
                      return null;
                    },
                  ),
                  TextFormField(
                    controller: amountController,
                    decoration: InputDecoration(label: Text('จำนวนเงิน')),
                    keyboardType: TextInputType.number,
                    validator: (String? str) {
                      if (str!.isEmpty) {
                        return "กรุณาป้อนจำนวนเงิน";
                      }
                      if (double.parse(str) <= 0) {
                        return "กรุณาป้อนตัวเลขมากกว่า 0";
                      }
                      return null;
                    },
                  ),
                  SizedBox(
                    height: 5,
                  ),
                  TextButton(
                      child: Text('เพิ่มข้อมูล'),
                      onPressed: () {
                        if (formkey.currentState!.validate()) {
                          var title = titleController.text;
                          var amount = amountController.text;

                          print('$title   and $amount');
                          // เตรียมข้มูล
                          Transaction statement = Transaction(
                              title: title,
                              amount: double.parse(amount),
                              date: DateTime.now());
                          // เรียก provider
                          var provider = Provider.of<TransactionProvider>(
                              context,
                              listen: false);
                          provider.addTransaction(statement);
                          Navigator.pop(context);
                        }
                      },
                      style: TextButton.styleFrom(
                          backgroundColor: Colors.purple,
                          foregroundColor: Colors.white,
                          shadowColor: Colors.black))
                ],
              )),
        ));
  }
}
เมื่อมีการกดปุ่ม เพิ่มข้อมูล จะมีการเรียกใช้ addTransaction Methode ที่สร้างไว้ และใน Methode addTracsaction จะมีการแจ้งเตือน Consumer ด้วย notifyListeners() ก็จะทำให้ข้อมูลแสเงหน้าจอมีการอัพเดท แต่ทั้งนี้ ข้อมูลที่ป้อนไว้จะหายหมดเมื่อปิดแอป ดังนั้น จะต้องมีการนำค่าไปบันทึกลง Database เพื่อให้บันทึกข้อมูลแล้วดึงกลับมาใช้งานภายหลัง


